|
||||||||
| English | TOPへ | はじめに | 洋裁初心者講座 | 洋裁用語 | 型紙DL | 生地屋さん | おすすめ洋裁の本 | |
洋裁用語、文の英語翻訳
| 英会話の先生に一緒に洋裁動画を見てもらいながら翻訳したものです。(先生がイギリス人の為イギリスの英語です) 英文は洋裁関係の方でサイトをお持ちの方は、自サイトの英語化にご自由にお使いください。 間違いやこういう言い回しのほうが伝わるよ~というのがありましたら掲示板へ教えていただけたら幸いです。 英文を書くときはTimes New Roman というフォントが大体の英語圏のPCに入っているので文字化けしないとの事だそうです。 ちなみに全角スペースは文字化けするので注意 |
| 接着芯 | Interfacing | |
| 胴部分 | bodice, | |
| 見返しと裏になるほうの衿に接着芯を貼ります。 | Apply Interfacing Inside the cover and lining side of neck. |
|
| 裁断した全てのパーツの端をほつれ止めをしてください | Do stitch holder all the
cutting parts. |
|
| ← That is a method of zig zag sewing for home use. | ||
| 布の端が押さえ金の真ん中にくるようにします。 | Make edge of cloth comes to center of metal holder. | |
| 右側に針が落ちるときに、布からはみ出るようにジグザグで縫っていきます。 | When needle goes down on right side, As to be forced out and sew zig zag. | |
| こうするとはみ出た部分が布の端を包んでくれてほつれませんよ!
ほつれ止め仕方の動画はこちら http://www.youtube.com/watch?v=0UfF6HyxXeM |
This way a part that
being forced out covering edge of cloth and not to get
frayed. Below URL : how to stitch holder. http://www.youtube.com/watch?v=0UfF6HyxXeM |
|
| リボンを通すための紐を作ります。 |
Make string for through the ribbon. | |
| 縫い代をアイロンで裏側へ折ります。
|
Fold a margin to sew up to the other side with iron. | |
| 半分に折ります。 | On top of that fold in two. | |
| 端から2~3mmの所を縫う。 | Sew 2~3mm from the edge. | |
| 出来上がった紐の両端を折ります。 |
Fold both sides of finished string. | |
| そでの印の上に折った紐を重ね両端を縫います。 | String which folded on the mark of sleeve layer and sew both edge. | |
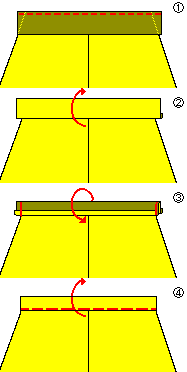
| 前身頃と見返しを中表に重ねて赤い線のところを縫い合わせます。
|
Front and inside the cover layer with cloth folded inside out and sew together where red line at. | |
| 表に返して、縫ったところをステッチをかけるか、アイロンをかけて整えます。 | Turn inside out and stitch where sewed or press with iron. | |
| 袖をつける場合は身頃の上に袖を中表に重ね、袖の肩山と身頃の肩山を合わせて縫います。 縫ったら袖を広げ、袖付けと、脇の縫い代をアイロンで割り、袖口も折り返しておきます。 |
Case of if applying sleeve, sleeve layer as the cloth folded inside out on the bodice, Sew highest part of the shoulder of sleeve and bodice together. After spread sleeve, Press with iron margin to sew up of arm and sleeve seam, Also flap the cuff too. | |
| そでの縫い方動画はこの動画の1分05秒から2分42秒まで http://www.youtube.com/watch?v=Iq2ffJWqUs0 |
Below URL: how to sew
cuff 1:05~2:42 http://www.youtube.com/watch?v=Iq2ffJWqUs0 |
|
| 袖底を縫います。 | Sew bottom of sleeve. | |
| 袖口の縫い代を裏に折る。 |
Pull down a margin to sew up of cuff to inside. | |
| アイロンで型をつけておいて手縫なり、 ミシンなりで袖口をぐるっと縫ってください。 |
Press with iron and hand stitch either with sewing machine, sew around cuff. | |
| 衿を縫います。 | Sew collar | |
 (1) 図のように身頃に中表に衿を重ね縫います。 (1) 図のように身頃に中表に衿を重ね縫います。(2) おこします (3)半分のところで裏に折り返し、左右を縫います。
(4)表替えして、ステッチをかけます。
この時紐とかを縫いつける場合は(1)の前に仮止めして、一緒に衿と縫いこむと綺麗に出来ます。 |
(1) Like on the
illustration, sew collaras the cloth folded inside out
layer on the bodice. (2) Rase up. (3) Folded inside out where half way, sew right and left side. (4) Refacing and stitch. In case if sew strings etc before (1) sew temporary and sew with neck together. |
|
| えりの縫い方動画はこちら http://www.youtube.com/watch?v=3QR24jo10i0 えりをつける部分の形は違いますが、縫い方は同じです。 |
Below URL: how to sew
collar http://www.youtube.com/watch?v=3QR24jo10i0 It is different shape, but same method. |
|
| 袖付け、すそ、身頃の脇をの縫い代にステッチをかけるか手縫でヒラヒラしないよう、縫い代を縫っておく。 | Stitch a margin to sew up side of sleeve seam, hem, bodice, or hand stitch and make sure not flipping. | |
| 前後の脇は縫い合わせません、あけておきます | Don't sew together front and back side together. it keeps open. | |
| 前中心は好みでスナップをつけたりマジックテープをつけたりしてください。 | For center of front, you can arrange with snap , Hook-and-loop fasteners etc. | |
| このペンは、水で消去可能です。 | this pen is erasable with water. | |
| そで山にはそでを立体にする為に余裕が入れられています。 | There extra space on the sleeve, reason for make it 3 dimensional. | |
| 必ずギャザーを寄せてください | Make sure squeeze the gather. | |
| 表から出来上がり線の上下2~3mmのところにギャザー用に2本縫って行きます。 | sew 2lines on the 2~3mm on top and bottom from front of finishing line. | |
| 重要!この時縫い初めと縫い終わりは、布の端から5センチ以上離れたところから縫い始める 初めと終わりの糸は少し長めに出しておく。 |
"Important" Beginning of sewing and end of it make sure starting from a way over 5cm from the edge and make sure have extra thread. |
|
| ギャザーの寄せ方 | How to squeeze gather. | |
| ミシンの縫い目の長さを長くし てください。 | Make longer sew length on the machine. | |
| ミシンの上糸糸調節を弱く、もしくは数字を小さくする | Turn down the dial for the upper thread. | |
| 端から1.5cmの所を縫う | Start sewing from 1.5cm from the edge. | |
| 縫い代の中を2本縫う | Sew 2 lines in margin to sew up. | |
| 1本より2本縫ったほうがギャザーが均等に寄せやすい | Sew 2 lines gatherer better than 1 line. | |
| 縫い始めは糸がすっぽ抜けないように、ミシンの後に糸を長く流して置き、縫っていきます。 | For beginning of sewing , make sure have extra thread after machined. | |
| 縫い終わりは長めに糸を残し切るといいです。 | For the end make sure have extra thread and cut. | |
| 糸調子を元に戻す | Return thread adjustment. | |
| 表側 | front side. | |
| 裏側 | reverse side. | |
| 縫い代を後中心に倒す |  Fold
the margin towards center back. Fold
the margin towards center back. |
|
| 赤い線をバイアステープで包む | Wrap the red line by bias tape. | |
| 布の裏に接着芯を貼る | Put the facing material on the reverse of thefabric. | |
| アイロンで接着します | Adhere with an iron. | |
| 上から圧力をかけて15秒くらい押さえる | Apply pressure, for about 15 seconds , on to the iron by pushing straight down. | |
| アイロンを浮かせて次の場所へ移動する | Lift and place it to the next arer. | |
| 布の上でアイロンは滑らせてはいけません。 | don't slide the iron along the material. | |
| 接着芯を張った後型紙を重ねて切り出します | put the paper pattern on
to the material and mark around it. On youhave done this cut along the lines. |
|
| ***と***のまわりをほつれどめをします。 | Rock stitch around the edge of the *** and ***. | |
| ***を半分に折る | Fold the *** in half. | |
| 周り一周を縫う | Noow,Sew along all the edges. | |
| 角は針が刺さった状態で向きを変える | When you reach a corner, leave the needle in and turn the material. | |
| 前身ごろの股上にのび止めテープを貼る | Apply stay tape to the
front to the trousers, from the crotch to the waist. At this point, the trousers are inside out. |
|
| 細く切った接着芯でもよい | If you're using facing material you only need to cut a thin strip. | |
| この区間にファスナーが付く | The fastener sticks to this section. | |
| (あきどまり)に目印として切込みを入れておく | When the (zip ends), snip the material as a mark. | |
| (股下)から(切り込み)までを縫う | sew between the (snip) and the (crotch). | |
| 返し縫いを忘れずにね | Don't forget to backstitch at the start and finish. | |
| (ズボンの前身ごろ)を表が上になるように置く | the (front of the body) is inside side out | |
| (見返し)は裏が表になるように置く | The (facing) upside down. | |
| (見返し)を裏側に折る |
Fold the (facing material) under. | |
| (開きどまり)のところからステッチをかける | Sew the topstitching from the (end of the opening). | |
| 端から2~5㎜位のところを飾り縫い | Sew the edges together about 2-5mm in from the edge. | |
| ファスナーをつけます | Take the ziper. | |
| ファスナーを開いて裏を上にして置きます | Open the zipper and use it inside out. | |
| ファスナーの端と布の端を少し離しておく | Keep a small edge between the zipper and the edge of the fabric. | |
| ファスナーの右端を縫う | Sew the right-side end of the zipper. | |
| (開き)のところまで縫う | Sew to the end of the (opening). | |
| (持ち出しのはし)と'前中心)の縫い代を合わせる | Sew the (extension material) to the (center front). | |
| 出来上がり線より1~2mm縫い代の内側を縫う | Sew inside the margin at 1 or 2mm. | |
| (前中心)をはしから2mmの所を縫う | Sew inside 2mm on the (center front) edge. | |
| ファスナーを閉めます | Close the zipper. | |
| 表に返す | Turn the material in side out. | |
| 縫い代を左右に割る | Spread open the seam. | |
| 縫い代を1cm折る | Fold the material 1cm in from the edge. | |
| 反対も同じように縫う | Repeat on the other end. | |
| 二つ折りして両端を合わせる | Fold material in half making both edge are together. | |
| ミシンの1.5cmのラインに布の端が来るように布を置く | Align the material along the 1.5cm line on your machine. | |
 印のないミシンはテープにマジックなどでラインを引いておくと簡単 |
If there's no margin mark, draw the line on to scotch tape. | |
| 縫い終わりは2cmほどあけて返し縫いをしておきます | Stop sewing 2cms before the end. | |
| ゴムを中に入れる | Push the elastic inside the material. | |
| ゴム入れ口を閉じる | Sew the hole. | |
| 糸を切ったら完成です | Cut the thread and it's finished. | |
| このような(髪留め)の作り方です | therse aer the differnt typs of (scrunchie) you can make. | |
| (布)を切ります | cut the (material). | |
| あまり布でテストして好みの幅を見つけてね | Try making the scrunchie from the remainder of cloth, then find the position of the preferred width. | |
| 表が内側になるように折る | Fold material inside out. | |
| 縫い合わせてわっかにする | Sew the seam and make a tube. | |
| 上側の生地を小さくたたむ | Fold the upper part in on them selves. | |
| 上側の生地を包みながら半分に折る | Fold and wrap the upper part. | |
| 縫い代を縫う | Sew along the seam margin | |
| 内側のたたんだ生地を縫わないように注意する | Attention, don't sew the inside part. | |
| 中の生地を引き出す | Pull out the inside material. | |
| この時針が布に刺さった状態にする | Keep the sewing
machine's needle in the fabric when you pull out the
inside material. this will keeo the fabric in place. |
|
| 引っ張り出したら縫う | Sew after pull out the material. | |
| 縫い始めと縫い終わりの間は3~4cm開けておく | Stop sewing 3 or 4cms before the end. | |
| ここから表に返す | turn the material inside out. | |
| 形を整える。 | Make it look attractive. | |
| 生地の縦横の長さを変えると雰囲気が変わるよ | If you change the length
the style and breadth of the cloth, you can change. |
|
| そで口をアイロンで折り目をつける | Fold the cuff and then iron. | |
| 下の糸を長めに引き出しておく | Pull the lower thread longer. | |
| そで山にギャザーを寄せる。 | Gather the top of the sleeve. | |
| 上側の糸の調子を弱くする | Turn down the dial for the upper thread. | |
| 縫い目の長さも長めにします | Make the length of the stitches longish. | |
| 1本目は布の端から0.2~3mmの所を縫う | Sew the first seam 0.2 or 0.3cm in from the edge. | |
| 縫い終わったら針を上げる 糸を後へ長めに引っ張り出す |
Pull the lower threads away from the machine and leave them long. | |
| 2本目は1本目から5mmくらいの所を縫います | Next, sew the second seam 0.5cm in from the first seam line. | |
| 長めに糸を出して切る | Pull the threads long and cut. | |
| 上の糸の調子と縫い目の長さを元に戻す。 | Return the tension dial and the length of the stitch to their original settings. | |
| 裏から下の糸だけを引っ張る | Pull the threads on the reverse side to gather the material. | |
| そで底を縫います | Sew the underarm. | |
| そでを中表に折ってそで底を縫います | Fold the sleeve so it is inside out. | |
| そで口を折る | Fold the cuff back. | |
| そで口を縫う | Sew the cuff back. | |
| 内側から縫う | Sew the cuff on the inner side. | |
| 表替えす | Turn the material inside out. | |
| そでを見頃に縫いつける | Sew the sleeve on to the body. | |
| 表にしたそでを表身頃側に回す | Turn the sleeve and the body inside out. | |
| 見頃とそでが中表になるように合わせる | Put the sleeve and body together face to face. | |
| 脇の縫い目とそで底の縫い目を合わせる | Put the under arm seams of the body and the sleeve together and pin. | |
| そで山の印と身頃の縫い目を合わせる | Do the seam for the top of the sleeve and the shoulder seam. | |
| 下糸を引いて長さを調節します | Pull the thread so that the sleeve and body align. | |
| ピンを打つ時合わせる場所 布端ではなく出来上がるラインを合わせる。 ほんの少しだけすくう |
Pin along the seam line
about 1cm from the seam. If you pin together at the edge, The top of sleeve will come away from the body. |
|
| ピンを打つ | Pin the cloth. | |
| 出来上がり線より2~3mmの所を手縫いする。 | Hand sew 0.2 or 0.3cm from seam line. | |
| しつけ糸ををしておけばピンを外せるので、後でミシン縫いが楽です | If you're hand sewing, you can easily sew by sewing machine by pulling out the pins. | |
| 今ここの縫い方 | How to sew the area shown here. | |
| そでぐりを縫う | Sew the arm hole. | |
| 完成 | finish! | |
| パフスリーブの底から糸を引き抜く | Pull a thread from bottom of puff sleeve. |
